Next year will be the 50th anniversary of the Dassault Mirage III entering service with the Armee de l'Air (French Air Force) and I have committed myself to building a number of models of various versions of the ubiquitous French fighter for the French Air Forces SIG display already being planned for Scale Modelworld 2011 (We haven't even had the 2010 show yet).
One of the variants that I have volunteered to build is the Mirage IIIBE two seat trainer using the Heller IIIB as a basis for the conversion, I actually started this a few years ago but it got shelved a some point and had been languishing in a box out of sight for quite a while.
So far the rear fuselage has been assembled, as have the wings, a new nose cone has been fabricated from layers of 40 thou. plasticard, the cockpit and ejector seats have been partly detailed using a spare etched brass fret from the Heller Hi-tech version of the kit. The ventral fuel tank pack and afterburner have been cross kitted from the ESCI kit, however this requires further detailing, a jet pipe has been cobbled together from a spare resin one from the Fonderie Miniatures Mirage F.1B kit and a turbine casting of my own.
Additional work has included separating the flaps/elevons so that they can be remounted in the drooped position characteristic of the Mirage III at rest and rescribing the raised panel lines.
As can be seen from the photograph there is a lot more to be done before the model is finished and I will be recording my progress in future posts.
This work by Roland Turner is licensed under a Creative Commons Attribution-Share Alike 2.0 UK: England & Wales License.
Wednesday, 15 September 2010
Tuesday, 7 September 2010
Project Airfix
Those marvelous people at Airfix have come up with an idea to promote the modelling hobby to young people.
Inspired by the Airfix episode of James May's Toy Stories on BBC Television when it was demonstrated that when given the opportunity and some encouragement, youngsters can appreciate there are alternatives to the likes of the X-box. Once they had had the chance to build a model the majority of children who took part said that they actually preferred modelling to computer games.
There will no doubt be some cynics who will say that this is just a commercial exercise, but I would like to ask them, what is wrong with that? In the end the success of companies like Airfix is essential to the future of our hobby, the more young people they can attract to pleasures on building models the better. Without the revenue from the sales of existing products there will be no money to invest in new products and our wish lists will remain just that - wishes.
So, if you are involved in any sort of youth organisation, or know someone who is, go to the Project Airfix Page of their website and compete the down loadable form.
Project Airfix |
There will no doubt be some cynics who will say that this is just a commercial exercise, but I would like to ask them, what is wrong with that? In the end the success of companies like Airfix is essential to the future of our hobby, the more young people they can attract to pleasures on building models the better. Without the revenue from the sales of existing products there will be no money to invest in new products and our wish lists will remain just that - wishes.
So, if you are involved in any sort of youth organisation, or know someone who is, go to the Project Airfix Page of their website and compete the down loadable form.
Tuesday, 27 July 2010
Classic Airframes Boulton Paul Defiant Mk.I -1/48 Scale
Continuing the Battle of Britain 70th anniversary theme in 1/48 scale here is my Boulton Paul Defiant. As a day fighter it was less than successful, only two Defiant squadrons, No.s 264 and 141, played any part in the battle before being withdrawn when its shortcomings became apparent.
This model was built using the first issue from Classic Airframes which has a number of inaccuracies, but none-the-less, with a some rectifications, builds up to look like the real thing. The main shortcomings relate to the fuselage cross-section and the shape of the nose, the latter was relatively easy to dear with by using Milliput to re-profile the area around the engine deepening the curvature on the underside and broadening the top so that it would 'contain' a Merlin engine. The rear fuselage would require far more radical surgery to correct and I decided to leave this as it is, while the result is the finished model looks a little on the plump side it isn't too much of a distraction.
Another part of the kit that has often been criticised is the turret's internal details, however once assembled little can be seen (especially as it is all black) so any extra effort would tend to be wasted in this area.
The model was finished as PS-A serial no. N1535, flown by S/Ldr P Hunter with air-gunner Sgt F. King the aircraft was shot down on 24th August 1940.
The paint was Aeromaster acrylics and the decals were from the kit, the oil bowser trolly came from the Revell ground equipment set.
This work by Roland Turner is licensed under a Creative Commons Attribution-Share Alike 2.0 UK: England & Wales License.
Friday, 16 July 2010
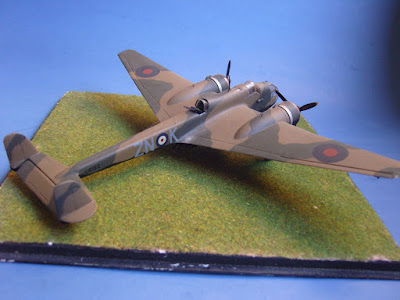
Classic Airframes Bristol Blenheim Mk.If - 1/48 Scale
With the various 70th Anniversary commemorative events currently taking place I thought it might be apt to have a look at one or two of the less well known types, in model form, operated by Fighter Command during the Battle of Britain.
The first subject is the fighter version of the Bristol Blenheim Mk.I built from the Classic Airframes kit.
As with any short run kit it does not go together with ease of the likes of Tamiya, Hasegawa, etcetera's offerings but requires a few more skills and is not for the inexperienced modeller. Classic Airframes have issued the kit twice and made some improvement, particularly the resin wheel well inserts, the second time around. This was necessary as the inserts in the first issue simply did not fit properly inside the nacelles being rectangular boxes in shape they were far too deep at the rear for the space available. In the later issue they were replaced with inserts that have sloped top sides allowing them to be accommodated within the wing/nacelle mouldings.
Needless-to-say it was one of the first issue kits that I used for this model and soon encountered difficulties with the wheel well inserts. Despite sanding the tops of the resin mouldings to the point where they were so thin that they became transparent the top and bottom wing halves would still not meet along both leading and trailing edges. I then resorted to thinning the plastic (From the inside) of the upper wing/nacelle, as with most limited run kits the material is quite thick so this improved matters considerably but still did not completely solve the problem. In the end, having first secured the inserts in place in the lower wing halves I glued the leading edges together with superglue (Cyanoacrylate) leaving the trailing edges unglued with a small gap between top and bottom surfaces. Once the glue along the leading edge had fully cured I then glued and clamped the trailing edges together which worked quite well but the knock-on effect was that the wings were now deeper in chord than the inset wing roots of the fuselage which then required enlargement to accept the wing sub-assemblies.
While this was going on I was also working on the fuselage, for the most part this was problem free, the cockpit and turret interiors are nicely detailed and fitted well only requiring a few minor additions such as a pilot's harness from etched brass and instrument decals from the Reheat range. However, once the transparencies were in place it became evident that there was a fit problem with an appreciable step down from the clear parts to the fuselage sides and top. To remedy this I used two part epoxy putty (Milliput) which was easily spread with a wet spatula to blend the contours of the fuselage into the profile of the canopy having first protected the transparent areas with a double layer of masking tape. Once set (I usually allow 24 hours) the Milliput was sanded smooth, any minor pitting or blemishes filled with "Green Stuff" and re-sanded, panel lines were then re-scribed and the rails for the sliding access panel of the canopy on top of the fuselage which had been obliterated in the process were replaced with fine rectangular section plastic rod.
The tailplanes (stabilisers) as supplied in the kit are intended to be butt jointed to the fuselage which I felt would result in a weak joint prone to break at the slightest knock and it would also be difficult to adjust their alignment. I therefore drilled a pair of small holes in each of fuselage root areas and into end faces of the tailplanes, carefully measured to correspond with each other, into these holes I inserted brass wire pins. The pins reinforced the joint once the tailplanes were glued in place and because the wire was thin and bendable it was possible to adjust the alignment so that both sides were perfectly horizontal.
The kit's resin engines are beautifully moulded in one piece but have separate exhaust pipes from each cylinder to the Townend ring which proved to be a problem to get them to fit properly and connect at both ends. In the end I decided to leave them off as once the cowling is in position they are barely visible anyway.
The undercarriage and final detailing presented no significant problems, the model was painted using Aeromaster acrylics for the upper surfaces and my own acrylic mix for the 'Eau-de-Nil' under surfaces. It was finished in the markings of No. 604 (County of Middlesex) Squadron, based at Northholt in July 1940 using Xtradecal roundels, codes and serials the narrow finflash came from an Almark 1/72 scale decal sheet.
This work by Roland Turner is licensed under a Creative Commons Attribution-Share Alike 2.0 UK: England & Wales License.
Tuesday, 13 July 2010
Dassault Mirage IIICJ 1/48 Scale
This model was built from the Heller kit with added cockpit detailing using the etch brass set produced by Airwaves for the "Hi-Tech" version of the kit. At the time E.D Models (The then proprietors of Airwaves) were selling off the unused, surplus sets, so I acquired a quantity which I am still using. The ejector seat is from Neomega.
The metallic finish was again achieved using Alclad by masking around the larger panels and airbrushing them with different shades. The smaller panels were replicated by using sections of silver decal sheet cut to the correct size.
Aeromaster's "Desert Mirages" set was used for the marking with model finished as an aircraft of the Israeli Air Force's 'First Jet Squadron' during the Six-Day War in 1967.
This work by Roland Turner is licensed under a Creative Commons Attribution-Share Alike 2.0 UK: England & Wales License.
Labels:
Aeromaster,
Alclad,
Heller,
Mirage "Israeli Air Force" Neomega
Monday, 3 May 2010
Avro Manchester 1/72 Scale
This is a conversion that I built back in the 1990s and received a Highly Commended at the IPMS Nationals competition.
The kit used was the Airfix Lancaster with DB Productions' resin engines and propellers, outer wing panels and the central fin were scratch built using plastic card. Tailplanes and the outer fins were adapted from the kit parts, the bomb aimer's transparency was replaced using the Aeroclub vacformed early Lancaster part. I chose to build an early production version of the type thus avoiding the need to find a suitable mid-upper turret.
Finished as s/n L7288 EM-H of No. 207 Squadron the model was airbrushed using Extracolor for the camouflage and Humbrol for the undersides. Decals came from Modeldecal, Almark and Extradecal generic sets except the Medium Sea Grey serial numbers which were hand painted onto clear decal film.
This work by Roland Turner is licensed under a Creative Commons Attribution-Share Alike 2.0 UK: England & Wales License.
Wednesday, 28 April 2010
Academy Hawker Hunter F.6
Hunter F.6 001
Originally uploaded by sisaphus
The Academy Hawker Hunter kits can be a real pain to put together, particularly getting the wings properly aligned and there are also problems with the cockpit.
Starting with the cockpit, the kit parts are very basic and worst of all under scale , the ejector seat is closer to 1/72 than 1/48. Fortunately there are a number of replacements available from after-market suppliers and I chose to use the resin and photo-etch cockpit set from Aries. This includes separate etched harness for the bang seat allowing some variation, unlike the all resin ones that all look exactly the same. A further benefit of having a large lump of resin in the nose is that it helps to balance the model overcoming tail sitting.
The problems with fitting the wings was not so easy to solve as they stem from the way the way Academy designed the kit. They have included the intake trunking and the engine compressor fan which all have to be assembled and inserted into the fuselage before it is glued together and the wings built as separate sub-assemblies are then meant to slide over the parts of the trunking that protrudes though the sides of the fuselage. However there is no clear indication or positive location points to ensure that the assembly is aligned so that the trunking is square to the fuselage's vertical datum line. This is further complicated by the huge wing root cutouts in the fuselage sides into which the wing sub-assemblies are supposed to slot, with only small locating lips a the front and back. Their profiles do not match those of the the wings in depth, the distance between top and bottom of the wings is less than the cutout's resulting in gaps. In the end, after a couple of abortive attempts resulting in damage to the trunking I resorted to building a stubby box spar profiled to fit inside the wing roots using plastic card in place of the trunking. With this in place inside the completed fuselage I was able to adjust the alignment by simply rubbing down the upper or lower surface until the wing slid into place correctly. Of course this meant that the plastic card spar was visible through the intakes, but a couple of FOD guards also fabricated from plastic card solved this difficulty.
Once this was done the rest of the kit was straight forward and resulted in a model that looks like a Hunter capturing its elegant lines.
The model was finished in the markings of no. 19 Squadron using Aeromaster decals, the paint used for the camouflage was Extracylics and the undersides were painted with Tamiya titanium silver.
This work by Roland Turner is licensed under a Creative Commons Attribution-Share Alike 2.0 UK: England & Wales License.
Monday, 26 April 2010
The "Unbuildable" Fonderie Miniature Halifax
Handley Page Halifax
Originally uploaded by sisaphus
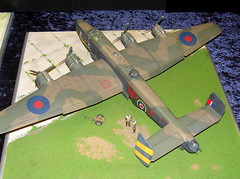
As I mentioned in an earlier post the Fonderie Miniatures 1/48 scale Handley Page Halifax Mk III has been described as "Unbuildable", here is a photograph that disproves that claim.
This Halifax was on the Quarter Scale Group's stand at the East Midlands Model Show, Hinckley, Leicestershire 25th April 2010. I am not 100% certain as to the identity of the builder (If it is your model please contact me and I will be happy to credit you).
Finished as "Friday the Thirteenth" this model shows what can be achieved with the F.M kit by a top class modeller and is and inspiration to other modellers.
I have two of these kits currently under construction (see previous post) and will be charting my progress with them in this blog, I just hope that I can come close to the standards demonstrated with this example.
Certainly the F.M. kit requires a lot of work and is not for the the novice but anyone who has some modelling experience should be able to achieve and acceptable result with some time and patience.
This work by Roland Turner is licensed under a Creative Commons Attribution-Share Alike 2.0 UK: England & Wales License.
Saturday, 13 March 2010
Aircraft Detail for Modellers Group at Flickr.
As a result of some feedback that I have received and having reviewed my viewing statistics I have set up a new group on Flickr called “Aircraft Detail for Modellers”.
I was amazed to find that the most popular photograph on my photostream at Flickr was this picture of the pilot's seat from one of the Battle of Britain Memorial Flight's aircraft. A conversation with a friend and fellow modeller explained the reason, he is building the Tamiya 1/32 scale Spitfire and had used my photo as reference for painting and detailing the seat in his model. This led me to think – it would be a good idea to create a resource on Flickr to enable modellers who are also Flickr members to post and share their photographs of aircraft details so that other modellers can access and use them?
The more I thought about this the more I was convinced that it would be of benefit to other modellers, I have often wished that I could quickly access a photographic reference rather than trawl through a pile of books and magazines to find that elusive detail that is needed to complete a model only to be frustrated and the model put to one side. The advantage of this group will be that, assuming modellers post their photos, any other modeller can view the picture and use it as a reference, this would be especially useful were there is only one example of the aircraft in a museum or collection thousands of miles away in another country so a day trip to take a few photos is out of the question.
To be truly effective the group needs to have lots of people posting their photos to build substantial pool of pictures, so if you are already a Flickr member please become a group member and post your detail photographs. If you are not yet a member, have a look at what is already there by clicking on the link below and if you like what you see and want to participate, open an account (The basic account is free, a “Pro account” is $24.99 a year) and start posting.
Aircraft Detail for Modellers at Flickr.
This work by Roland Turner is licensed under a Creative Commons Attribution-Share Alike 2.0 UK: England & Wales License.
Wednesday, 3 March 2010
Dragon Focke-Wulf Fw-190 A-8
Dragon kits have a lot of very finely moulded detail but the fit often leaves a lot to be desired. Unlike Tamiya, their designers do not seem to keep in mind that the kits are going to be constructed by people with widely differing abilities, the plastic is quite thin and delicate and frequently the parts lack clear or positive location points making assembly something of a trial and error process. Because of this the major parts such as the fuselage halves usually require reinforcement otherwise things tend to come apart even with the carefullest of handling.
This Fw-190 A-8 is no exception and in particular the undercarriage legs proved to be an absolute swine to get symmetrical with just the right degree of toe-in. My first three attempts resulted in the model sitting at varying drunken angles to left or right with the third being the least bad. Although in all other respects it was finished, I put the model away in a box for about a year, not wanting to display the thing in that state. In the end I dug it out, took off the undercarriage and with a good deal of trepidation tried to get it right and, believe it or not, everything slotted neatly into place without the slightest problem at the first attempt!
The paint used was Extracolor (It was built before I had become a convert to acrylic paint) and the decals are from Aeromaster set No. 48-061.
This work by Roland Turner is licensed under a Creative Commons Attribution-Share Alike 2.0 UK: England & Wales License.
Tuesday, 23 February 2010
Interview with Wing Cdr W "Taffy " Holden
In the post about my 1/48 scale Lightning F.1 I mentioned that the aircraft that I had finished the model as, had been taken on an unintentional flight by an engeneering officer, Wing Commander Walter "Taffy" Holden at RAF Lynham. By chance I came across the video below on YouTube, to be strictly accurate it is a still photograph of the actual aircraft preserved at Duxford as backgrown to a recording of an interview with the retired Taffy Holden on the BBC Radio 2, John Dunn Show some years ago.The matter of fact tone that he takes and his obvious concern for the safety of others in the predicament that he found himself in, only adds to
the admiration for his cool handling of a situation that would leave most of us jibbering!
Video from YouTube
This work by Roland Turner is licensed under a Creative Commons Attribution-Share Alike 2.0 UK: England & Wales License.
the admiration for his cool handling of a situation that would leave most of us jibbering!
Video from YouTube
This work by Roland Turner is licensed under a Creative Commons Attribution-Share Alike 2.0 UK: England & Wales License.
Thursday, 18 February 2010
Handley-Page Hampden 1/72 Scale
This model was built back in the mid nineties and was actually awarded a commended in the Bomber Command Trophy at the IPMS Nationals in the year that it was finished. It still appears from time to time on the Bomber Command SIG (Special Interest Group) display table at model shows
It is built from the old Airfix kit with quite few improvements, the wing tips were reshaped and a lot of internal detail was added (Little of which is visible). The tail and tail boom required a fair amount of reworking and filling to correct gaps and areas were the tools appear to have been damaged resulting in moulding faults.
The paint used was Extracolor and the decals came from Modeldecals range of roundels, codes and serials.
Although it requires some work the Airfix kit is not a bad representation of the aircraft, for sure the moulds show their age, but the kit has been around since the late sixties after all.
Sometime in the future I intend to tackle the Fonderie Miniature 1/48 scale Hampden but must get a few existing projects finished first!
This work by Roland Turner is licensed under a Creative Commons Attribution-Share Alike 2.0 UK: England & Wales License.
Labels:
Airfix,
Extracolor,
Hampden,
Modeldecals
Wednesday, 17 February 2010
Normanrie Niemen Yak-3
This Yak-3 is built from the Eduard kit and is finished in the markings of Normandie-Niemen Regiment, the Free French fighter unit operating within the Soviet Air Force.
The model is built pretty much straight from the box and uses the kit decals, the paint is from the old (Original) Aeromaster acrylics range.
The Normandie-Niemen unit fought a distinguished campaign on the easten front from 1943 and one of its Yak-3s is on display at the Musee de l'Air et Aerospace at Le Bouget just outside Paris.
History of Normandie-Niemen at Wikipedia.
Normandie-Niemen Museum (In French).
Photographs of the preserved Yak-3 at Le Bourget.
This work by Roland Turner is licensed under a Creative Commons Attribution-Share Alike 2.0 UK: England & Wales License.
Labels:
Eduard,
Normandie-Niemen,
Yak-3
Sunday, 31 January 2010
Vickers VC-10 1/144 scale
The VC-10 holds a special place in the hearts of many aviation enthusiasts, few aeroplanes can come close to, and I would contend, that none can surpass it for sheer elegance. It is one of those aircraft that just has that certain something extra about it - call it charisma if you like.
Needless to say, by modern standards the design is uneconomic, grossly fuel inefficient and no doubt the greenies will claim it has a carbon footprint the size of Canada (Just what does a carbon footprint look like anyway!?). However the Royal Air Force continue to operate a handful in the transport and air-to-air refuelling rolls and will continue to do so for another four to five years, by which time they will have clocked up half a century of service.
Given its popularity, the VC-10 has not been well served by plastic kit manufacturers with only the Airfix 1/144 scale example being widely available. Originally issued in their "Skyking" range in the 1960s with BOAC markings it was retooled as an RAF Mk K.2 tanker.
I have always felt that the late BOAC livery of royal blue cheat lines and tail fin with the gold 'Speedbird' emblem was designed for the VC-10 perfectly highlighting the aircraft's regal lines and this was the scheme in which I wanted to complete my model. As I only had a K.2 version of the kit to work with this meant 'back converting' it to the airliner version and finding suitable replacement decals. Also I was working to a target date for completion, the model was to be part of an exhibition celebrating British Jet Aircraft in Birmingham's Central Library.
Converting the kit was fairly straight forward, the ventral refueling bulge was cut away from each fuselage half and the resulting hole filed with 40 thou. plastic card bent to match the curvature of the fuselage any discrepancies being corrected later with filler. The locating slots for the wing mounted hose reel drums were similarly filled with plastic card and rubbed smooth with wet & dry glass paper. A fair amount of lead shot was secured in the front fuselage with Milliput to ballast the model and prevent 'tail sitting' and the side windows were blanked off internally with plastic card and filled before joining the fuselage halves together.
Having allowed 48 hrs for the cement to thoroughly dry a quick inspection revealed a problem, the tail fin, moulded integrally with the fuselage was leaning over to starboard at very noticeable angle. There was only one solution, cut the ******* thing off and re-mount it. It soon became clear the plastic along the joint between the fin and the fin was very thin (causing the problem in the first place) so it was necessary to insert a plasticard plug onto which the now separate fin could be attached and all resulting gaps filled with Milliput and sanded down.
The kit engines were discarded and substituted with Bra.Z Models resin replacements picked up at Scale Modelworld, click link below for their full range of resin kits.
The wings tailplane and painting will be dealt with in a future post.
Bra.Z Models kit list
This work by Roland Turner is licensed under a Creative Commons Attribution-Share Alike 2.0 UK: England & Wales License.
Labels:
Airfix,
Airliner,
BOAC,
Vickers VC-10
Tuesday, 19 January 2010
IPMS Birmingham Club Meeting
Our hobby is fundamentally a solitary activity, most of us build our models in the privacy of our own individual work room or a shed at the bottom of the garden and it is easy for us to become somewhat withdrawn from society.
The antidote to this situation is to become a member of a modelling club and we are fortunate that we have an active organisation, the International Plastic Modellers Society (IPMS) which fosters our activities. Founded in London in the early 1960s the IPMS has grown to be a truly international society with branches in many countries around the world, as anyone who has visited the annual Scale Modelworld exhibition at Telford, UK will have seen.
I regularly attend meetings of the Birmingham branch of IPMS(UK) and our first meeting of 2010 took place on Sunday 17th January with a good attendance (Especially as annual subs were due!).
One of the themes for the meeting was restoring clear parts and a couple of members gave demonstrations of their methods of re-polishing scratched canopies and the like. Here George Green can be seen showing his technique to Dave Child and Ron Adams while others look on.
Of course other subjects arise, here John Duffield explains his preferred method of achieving a bare metal finish on an Airfix Lightning to Gareth Thomas and Terry Walton. I will return to John's methods in a future post as it is and interesting alternative to my own technique.
We also have a monthly competition and the winner for January was this superb battle ship, HMS Prince of Wales in 1/1200 scale built by Ron Adams.
The great thing about becoming a member of a club is that not only do you benefit from other modellers' knowledge but there is the added dimension of socialising with fellow modellers and over the years I have made a number of good friends, not just locally but throughout the UK and overseas. So don't be a modelling hermit, get out and, to start with, become member of your local club.
IPMS(UK) branches
IPMS Birmingham
This work by Roland Turner is licensed under a Creative Commons Attribution-Share Alike 2.0 UK: England & Wales License.
Sunday, 17 January 2010
Airfix's new releases for 2010
It has been rumoured for some time that Airfix would be producing a 1/72 scale Vickers Valiant, now that has been confirmed on their website along with a few other goodies.
The Valiant will be a 'Limited Edition' kit so, depending on the quantity of the production run, it could become scarce quite quickly and it may well be worth buying a spare or two to lay down for the future. Finally, all three of the V bombers will have been kitted by a mainstream, mass production manufacturer in 1/72 scale, something we aircraft modellers have wanted since the 1960s!
The other new tooling that Airfix have announced that caught my eye were a Spitfire Mk XII in 1/48 scale - the first Griffon engined version of the Spit. No other kit manufactured has done this variant before in this scale (or any other scale that I can think of), excellent choice Airfix.
Also in the pipeline in 1/48 are a Seafire Mk XVIIc two versions of the Bf-109E and two Westland Lynx helicopters (Army and Navy).
In 1/72 scale there will be a Spitfire Mk Ia, F-86F Sabre plus Canadair Sabre Mk 4, two versions of the Bf-110 (a C/D and an E) a Hawk T.1 and a Harrier GR.9
Of course there are a number of other subjects, for instance a 1/350 scale Trafalgar Class submarine, which I think is a double first for Airfix. Unless my memory is failing me I don't think they have ever kitted a submarine before and I am pretty sure that they are new to 1/350, if you know better please let me know.
It is great to see that Airfix is now in a position to produce new kits that modellers really want. Perhaps, now that it is part of the Hornby empire, they have a marketing team who understand their customers, in the past I have often felt that they still believed that their principal market were 7 t0 14 year old boys rather than middle aged men who were of that age group back in the 1960s and 70s when Airfix was at is peak.
For more information click on this link to go to the relevant page at Airfix's website:
Airfix new for 2010
Airfix new for 2010
This work by Roland Turner is licensed under a Creative Commons Attribution-Share Alike 2.0 UK: England & Wales License.
Labels:
Airfix,
New releases,
Vickers Valiant
Sunday, 10 January 2010
Tyranny or pleasure?
A conversation with one of the regular customers at the Parabellum model shop in Birmingham's Jewellery Quarter prompted the theme for this post.
This chap has built models since he was a boy and has tried various types of modelling particularly radio controlled boats, but over the past year has become a real enthusiast for plastic aircraft kits with the Spitfire being his favourite subject. He has been avidly reading articles in modelling magazines about such subjects as weathering, pre-shading and airbrushing and had become confused and unsure about the techniques he is using, asking the question "Am I doing the right thing?".
This led to quite a long, good humoured, discussion- with contributions from Nigel the owner of Parabellum - the conclusion of which is that there are no absolute rights and wrongs. If you are striving for strict historical accuracy then the only way to be sure that you have got it right is if you have a comprehensive set of colour photographs of your subject - unlikely in the case of WWII aircraft. Such is the nature of conflict that many of the planes used in the Second World War were destroyed long before they had lost their factory fresh appearance so heavy weathering is not always applicable.
Later, I was musing on this conversation and expanded my thoughts to encompass the idea of what is a good model and who has right to dictate how we should go about our hobby.
To the question "what is a good model?" my answer is; one that has given its builder something positive such as a sense of achievement or plain simple enjoyment. It does not have to be finished to competition standards or meet someone else's idea of a good model, just so long as it gave you some pleasure.
As to who can tell you how you should build and finish your models the short answer is - nobody!
There are few people (Fortunately, a very small minority) who seem to believe that, having won a few competitions, written some articles in magazines or in some other way come to prominence in the hobby, gives them the right to dictate to the rest of us. I have heard of several instances where modellers have be upbraided by one or of these mini tyrants for some minor infraction such as the wrong shade of paint, as if the fate of nations is going to turn on the matter. Such people do a dis-service to modelling and modellers and only discourage, unlike the vast majority who seek to help and encourage their fellows.
In the end we all build models for our own pleasure and satisfaction and how we go about it, our choice of subject and our individual preferences are unique to us and no-one has the right to tell us if we right or wrong. If you want to finish your aircraft models to represent the planes flown by Biggles, some fictitious squadron or air force, or in some completely imaginary colour scheme of your own devising who is to say that you can't?
Of course, some people build models specifically to enter into competitions and therefore have to meet certain criteria, but again it is their choice and nobody should be forced to meet those criteria if they have no desire to enter competitions. If you model purely for your own pleasure you are entitled to set your own standards regardless of anyone else's opinion.
The key word in all this is YOUR, in other words you bought the kit, paint and materials with your money, built it in your time, to your satisfaction.
This work by Roland Turner is licensed under a Creative Commons Attribution-Share Alike 2.0 UK: England & Wales License.
Saturday, 9 January 2010
Hasegawa Kawasaki Ki-61 Hien (Tony) 1/48 scale
Apart from the addition of an etched brass pilot's harness built straight from the box but finished with Aeromaster decals. The metallic finish is again Alclad the paints being Aeromaster acrylics, the camouflage has been applied deliberately in a rough and ready manner to represent painting at front line unit level.
The Ki-61 may not have had the most distinguished of careers, suffering engine problems, but it was the prettiest Japanese fighter of WWII.
This work by Roland Turner is licensed under a Creative Commons Attribution-Share Alike 2.0 UK: England & Wales License.
The Ki-61 may not have had the most distinguished of careers, suffering engine problems, but it was the prettiest Japanese fighter of WWII.
This work by Roland Turner is licensed under a Creative Commons Attribution-Share Alike 2.0 UK: England & Wales License.
Labels:
Aeromaster,
Alclad,
Hasegawa,
Kawasaki Ki-61 Hien
Friday, 8 January 2010
City of Birmingham Locomotive - 1/76 scale
For some time I had wanted to build a model of the Stanier Princess Coronation Class locomotive "City of Birmingham" to display on the IMPS Birmingham stand at model shows. The difficulty in achieving this aim was that the only plastic kit that could be used was the old Rosebud-Kitmaster Duchess of Gloucester which has been out of production since 1961 and consequently the few that turn up on the likes of EBay attract high prices making them more of a collector's investment than a build project. The alternative of using a specialist metal kit was also prohibitively costly. The solution to my dilemma came at the Warley Model Railway Show at the National Exhibition Centre two years ago, I got talking to one of the guys manning the Kitmaster Collector's Club stand about what I wanted to do. He promptly produced a Kitmaster box with artwork for the Battle of Britain Class loco, but inside it there was a Duchess of Gloucester, built after a fashion and badly painted, and offered it to me a reasonable price. My wallet was prized from its usual hiding place and cash exchanged.
That evening I got to work on the model, a quick examination led me to the conclusion that it had been assembled by a youngster, in fact it reminded me of my early efforts, glue in places where it should not be, paint hurriedly and unevenly applied with wavy demarcations. Now, there is nothing wrong with this, after all we all started this way, impatient to get a model together and painted so that everyone could admire our handiwork usually followed by it being played with to destruction or shot to pieces with an air rifle or set fire to in the back garden, ah the nostalgia!
Fortunately for me my Duchess of Gloucester had not suffered the usual fate of young boys' models and the inexpert construction worked to my advantage making it fairly easy to separate the kit parts with only some minor damage to the cab roof.
The next stage was going to be to improve the detailing of the kit and adapt it for my purpose, I will be relating that in future posts. Meanwhile, for those that would like to know more about Rosebud-Kitmaster here is a link to the Kitmaster Collector's Club website;
http://www.rosebud-kitmaster.com
Thursday, 7 January 2010
Airfix English Electric Lightning F.1 - 1/48 Scale
Built pretty much straight from the box this Lighting is finished in the markings of 74 Squadron, circa 1961. It represents serial no. XM135 the first Lightning to enter squadron service with the RAF and is now preserved at Duxford. It was in this aircraft that Wing Commander W Holden, the senior technical officer at RAF Lynham made an unintentional flight when he inadvertently engaged reheat while running engine tests on the airfield's main runway. Despite his lack of experience (The only plane he had flown before this was the DeHavilland Chipmunk basic trainer) he managed to land the Lightning with only minor damage on his fourth attempt after making three abortive approaches to the runway, a considerable feat of cool headedness!
Click link to hear an interview with Wing Cdr. W "Taffy" Holden on YouTube.
The metallic finish has been achieved using Alclad, using chrome for the intake ring, nose probe and other highly polished areas with a variety of shades of aluminum for different panels. I find Alclad to be the best medium for representing bare metal on models, so long as the instructions are followed a good result can always be obtained. Preparation is the all important factor both in terms of actual surface of the plastic (or whatever medium you are working in) and the priming prior to application, different shades require their own priming - for example chrome needs to be undercoated with gloss black enamel - the instructions on the bottle give the relevant details.
Petition on Facebook for Airfix to re-issue the 1/48 Lightings.
This work by Roland Turner is licensed under a Creative Commons Attribution-Share Alike 2.0 UK: England & Wales License.
Wednesday, 6 January 2010
Fonderie Miniature Halifax B III - 1/48 scale
The FM Halifax has been described by some modellers as unbuildable but having seen several finished examples at various model shows I beg to differ. For sure it is not as straight forward as a Hasegawa or Tamiya kit, it should be remembered that it is a short run kit and is probably best approached as if it were an injection moulded vacform.
I have acquired three of these kits over the past couple of years and currently have two under construction. The second one to be bought had already passed thought the hands of two other people who had both given up on it. It was nearly complete (Pictured above, after partial dismantling) but had a number of problems.
First and most obvious was that the fuselage was far from symmetrical, appearing to resemble a banana, also the tailplanes were at odd angles and one was set higher than the other. Added to this some parts for the turrets were missing, the upper turret aperture was blanked off and a roughly made replacement solid rear turret had been fashioned out of filler with some metal tubes to represent the guns.
In order to correct these faults it was going to be necessary to partially dismantle the model and find a subject aircraft to finish it as that would not require turrets. The latter was fairly easy to achieve, I remembered seeing a couple of Charles E Brown photographs of a C Mk VIII serial no. PP285 in K. A. Merrick's excellent book on the Halifax. This aircraft was retained by Handley Page for test purposes after WWII, it had a streamlined fairing in place of the tail turret and the no mid upper. It was a particularly attractive aeroplane being mostly bare metal but carrying RAF insignia, so this is the example that I decided to model.
A couple of hours work with a scalpel, razor saw and few other tools had the model stripped back to just the fuselage and the wings with the engines still in place, they were subsequently removed when I notice that some were mis-aligned. I was now ready to start correcting the problems, little did I realise the route this was going to take down. But all that will be related in future posts.
Tuesday, 5 January 2010
Welcome
Hello and welcome to my new modelling blog.
My intention in starting this blog is to talk about the models that I am building, future projects and some of the models that I have built in the past. I will also be looking at new kits as they appear and reference sources.
As my interests are mainly aircraft, particularly of World War Two vintage, the content is going to be biased in that direction. But I do build other subjects from time to time, for example one of my current projects is the steam locomotive "City of Birmingham" more on this anon.
Apart from commercial model building (e.g architectural models) I believe that modelling, as a hobby should be pleasurable - in the end if you do not enjoy doing it what is the point?
I will no doubt expand on these themes in future posts, for now happy modelling.
Roland
Subscribe to:
Posts (Atom)