Wednesday 15 September 2010

Dassault Mirage IIIBE in 1/48 scale

Next year will be the 50th anniversary of the Dassault Mirage III entering service with the Armee de l'Air (French Air Force) and I have committed myself to building a number of models of various versions of the ubiquitous French fighter for the French Air Forces SIG display already being planned for Scale Modelworld 2011 (We haven't even had the 2010 show yet).

One of the variants that I have volunteered to build is the Mirage IIIBE two seat trainer using the Heller IIIB as a basis for the conversion, I actually started this a few years ago but it got shelved a some point and had been languishing in a box out of sight for quite a while.

So far the rear fuselage has been assembled, as have the wings, a new nose cone has been fabricated from layers of 40 thou. plasticard, the cockpit and ejector seats have been partly detailed using a spare etched brass fret from the Heller Hi-tech version of the kit. The ventral fuel tank pack and afterburner have been cross kitted from the ESCI kit, however this requires further detailing, a jet pipe has been cobbled together from a spare resin one from the Fonderie Miniatures Mirage F.1B kit and a turbine casting of my own.

Additional work has included separating the flaps/elevons so that they can be remounted in the drooped position characteristic of the Mirage III at rest and rescribing the raised panel lines.

As can be seen from the photograph there is a lot more to be done before the model is finished and I will be recording my progress in future posts.

Creative Commons License
This work by Roland Turner is licensed under a Creative Commons Attribution-Share Alike 2.0 UK: England & Wales License.

Tuesday 7 September 2010

Project Airfix

Those marvelous people at Airfix have come up with an idea to promote the modelling hobby to young people.


Project Airfix
Inspired by  the Airfix episode of James May's Toy Stories on BBC Television when it was demonstrated that when given the opportunity and some encouragement, youngsters can appreciate there are alternatives to the likes of the X-box. Once they had had the chance to build a model the majority of children who took part said that they actually preferred modelling to computer games.

There will no doubt be some cynics who will say that this is just a commercial exercise, but I would like to ask them, what is wrong with that? In the end the success of companies like Airfix is essential to the future of our hobby, the more young people they can attract to pleasures on building models the better. Without the revenue from the sales of existing products there will be no money to invest in new products and our wish lists will remain just that - wishes.

So, if you are involved in any sort of youth organisation, or know someone who is, go to the Project Airfix Page of their website and compete the down loadable form.

Tuesday 27 July 2010

Classic Airframes Boulton Paul Defiant Mk.I -1/48 Scale

Continuing the Battle of Britain 70th anniversary theme in 1/48 scale here is my Boulton Paul Defiant. As a day fighter it was less than successful, only two Defiant squadrons, No.s 264 and 141, played any part in the battle before being withdrawn when its shortcomings became apparent.

This model was built using the first issue from Classic Airframes which has a number of inaccuracies, but none-the-less, with a some rectifications, builds up to look like the real thing.  The main shortcomings relate to the fuselage cross-section and the shape of the nose, the latter was relatively easy to dear with by using Milliput to re-profile the area around the engine deepening the curvature on the underside and broadening the top so that  it would 'contain' a Merlin engine. The rear fuselage would require far more radical surgery to correct and I decided to leave this as it is, while the result is the finished model looks a little on the plump side it isn't too much of a distraction.

Another part of the kit that has often been criticised is the turret's internal details, however once assembled little can be seen (especially as it is all black) so any extra effort would tend to be wasted in this area.


The model was finished as PS-A serial no. N1535, flown by S/Ldr P Hunter with air-gunner Sgt F. King the aircraft was shot down on 24th August 1940.

The paint was Aeromaster acrylics and the decals were from the kit, the oil bowser trolly came from the Revell ground equipment set.

Creative Commons License
This work by Roland Turner is licensed under a Creative Commons Attribution-Share Alike 2.0 UK: England & Wales License.

Friday 16 July 2010

Classic Airframes Bristol Blenheim Mk.If - 1/48 Scale

With the various 70th Anniversary commemorative events currently taking place I thought it might be apt to have a look at one or two of the less well known types, in model form, operated by Fighter Command during the Battle of Britain.

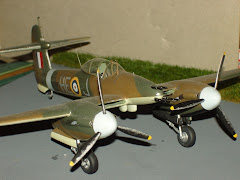
The first subject is the fighter version of the Bristol Blenheim Mk.I built from the Classic Airframes kit.

As with any short run kit it does not go together with ease of the likes of Tamiya, Hasegawa, etcetera's offerings but requires a few more skills and is not for the inexperienced modeller. Classic Airframes have issued the kit twice and made some improvement, particularly the resin wheel well inserts, the second time around. This was necessary as the inserts in the first issue simply did not fit properly inside the nacelles being rectangular boxes in shape they were far too deep at the rear for the space available. In the later issue they were replaced with inserts that have sloped top sides allowing them to be accommodated within the wing/nacelle mouldings.

Needless-to-say it was one of the first issue kits that I used for this model and soon encountered difficulties with the wheel well inserts. Despite sanding the tops of the resin mouldings to the point where they were so thin that they became transparent the top and bottom wing halves would still not meet along both leading and trailing edges. I then resorted to thinning the plastic (From the inside) of the upper wing/nacelle, as with most limited run kits the material is quite thick so this improved matters considerably but still did not completely solve the problem. In the end, having first secured the inserts in place in the lower wing halves I glued the leading edges together with superglue (Cyanoacrylate) leaving the trailing edges unglued with a small gap between top and bottom surfaces. Once the glue along the leading edge had fully cured I then glued and clamped the trailing edges together which worked quite well but the knock-on effect was that the wings were now deeper in chord than the inset wing roots of the fuselage which then required enlargement to accept the wing sub-assemblies.

While this was going on I was also working on the fuselage, for the most part this was problem free, the cockpit and turret interiors are nicely detailed and fitted well only requiring a few minor additions such as a pilot's harness from etched brass and instrument decals from the Reheat range. However, once the transparencies were in place it became evident that there was a fit problem with an appreciable step down from the clear parts to the fuselage sides and top. To remedy this I used two part epoxy putty (Milliput) which was easily spread with a wet spatula to blend the contours of the fuselage into the profile of the canopy having first protected the transparent areas with a double layer of masking tape. Once set (I usually allow 24 hours)    the Milliput was sanded smooth, any minor pitting or blemishes filled with "Green Stuff"  and re-sanded, panel lines were then re-scribed and the rails for the sliding access panel of the canopy on top of the fuselage which had been obliterated in the process were replaced with fine rectangular section plastic rod.

The tailplanes (stabilisers) as supplied in the kit are intended to be butt jointed to the fuselage which I felt would result in a weak joint prone to break at the slightest knock and it would also be difficult to adjust their alignment. I therefore drilled a pair of small holes in each of fuselage root areas and into end faces of the tailplanes, carefully measured to correspond with each other,  into these holes I inserted brass wire pins. The pins reinforced the joint once the tailplanes were glued in place and because the wire was thin and bendable it was possible to adjust the alignment so that both sides were perfectly horizontal.

The kit's resin engines are beautifully moulded in one piece but have separate exhaust pipes from each cylinder to the Townend ring which proved to be a problem to get them to fit properly and connect at both ends. In the end I decided to leave them off as once the cowling is in position they are barely visible anyway.

The undercarriage and final detailing presented no significant problems, the model was painted using Aeromaster acrylics for the upper surfaces and my own acrylic mix for the 'Eau-de-Nil' under surfaces. It was finished in the markings of No. 604 (County of Middlesex) Squadron, based at Northholt in July 1940 using Xtradecal roundels, codes and serials the narrow finflash came from an Almark 1/72 scale decal sheet.


Creative Commons License
This work by Roland Turner is licensed under a Creative Commons Attribution-Share Alike 2.0 UK: England & Wales License.

Tuesday 13 July 2010

Dassault Mirage IIICJ 1/48 Scale


This model was built from the Heller kit with added cockpit detailing using the etch brass set produced by Airwaves for the "Hi-Tech" version of the kit. At the time E.D Models (The then proprietors of Airwaves) were selling off the unused, surplus sets, so I acquired a quantity which I am still using. The ejector seat is from Neomega.

The metallic finish was again achieved using Alclad by masking around the larger panels and airbrushing them with different shades. The smaller panels were replicated by using sections of silver decal sheet cut to the correct size.

Aeromaster's "Desert Mirages" set was used for the marking with model finished as an aircraft of the Israeli Air Force's 'First Jet Squadron' during the Six-Day War in 1967.


Creative Commons License
This work by Roland Turner is licensed under a Creative Commons Attribution-Share Alike 2.0 UK: England & Wales License.

Monday 3 May 2010

Avro Manchester 1/72 Scale

This is a conversion that I built back in the 1990s and received a Highly Commended at the IPMS Nationals competition.

The kit used was the Airfix Lancaster with DB Productions' resin engines and propellers, outer wing panels and the central fin were scratch built using plastic card. Tailplanes and the outer fins were adapted from the kit parts, the bomb aimer's transparency was replaced using the Aeroclub vacformed early Lancaster part. I chose to build an early production version of the type thus avoiding the need to find a suitable mid-upper turret.


Finished as s/n L7288 EM-H of No. 207 Squadron the model was airbrushed using Extracolor for the camouflage and Humbrol for the undersides. Decals came from Modeldecal, Almark and Extradecal generic sets except the Medium Sea Grey serial numbers which were hand painted onto clear decal film.

Creative Commons License
This work by Roland Turner is licensed under a Creative Commons Attribution-Share Alike 2.0 UK: England & Wales License.


Wednesday 28 April 2010

Academy Hawker Hunter F.6


Hunter F.6 001
Originally uploaded by sisaphus


The Academy Hawker Hunter kits can be a real pain to put together, particularly getting the wings properly aligned and there are also problems with the cockpit.

Starting with the cockpit, the kit parts are very basic and worst of all under scale , the ejector seat is closer to 1/72 than 1/48. Fortunately there are a number of replacements available from after-market suppliers and I chose to use the resin and photo-etch cockpit set from Aries. This includes separate etched harness for the bang seat allowing some variation, unlike the all resin ones that all look exactly the same. A further benefit of having a large lump of resin in the nose is that it helps to balance the model overcoming tail sitting.

The problems with fitting the wings was not so easy to solve as they stem from the way the way Academy designed the kit. They have included the intake trunking and the engine compressor fan which all have to be assembled and inserted into the fuselage before it is glued together and the wings built as separate sub-assemblies are then meant to slide over the parts of the trunking that protrudes though the sides of the fuselage. However there is no clear indication or positive location points to ensure that the assembly is aligned  so that the trunking is square to the fuselage's vertical datum line. This is further complicated by the huge wing root cutouts in the fuselage sides into which the wing sub-assemblies are supposed to slot, with only small locating lips a the front and back. Their profiles do not match those of the the wings in depth, the distance between top and bottom of the wings is less than the cutout's resulting in gaps. In the end, after a couple of abortive attempts resulting in damage to the trunking I resorted to building a stubby box spar profiled to fit inside the wing roots using plastic card in place of the trunking. With this in place inside the completed fuselage I was able to adjust the alignment by simply rubbing down the upper or lower surface until the wing slid into place correctly. Of course this meant that the plastic card spar was visible through the intakes, but a couple of FOD guards also fabricated from plastic card solved this difficulty.

Once this was done the rest of the kit was straight forward and resulted in a model that looks like a Hunter capturing its elegant lines.

The model was finished in the markings of no. 19 Squadron using Aeromaster decals, the paint used for the camouflage was Extracylics and the undersides were painted with Tamiya titanium silver.

Creative Commons License
This work by Roland Turner is licensed under a Creative Commons Attribution-Share Alike 2.0 UK: England & Wales License.